This month on our blog it's all about rAge. And a big part of our excitement regarding rAge this year, was taking part in the official GES rAge
cosplay contest - our first official big cosplay event.
Today, we want to share how we went about creating these outfits. Compared to some of the other cosplay outfits at the event, ours were pretty basic, and we definitely plan to improve on our approach and techniques, but we had a lot of fun coming up with these, and we thought we'd share the process with those who are interested.
Let's start with the Hunter's saw cleaver (Bloodborne enthusiasts will recognise this iconic weapon). Firstly, we have to give credit and thanks where it's due: we got the saw cleaver tutorial from the amazing dude at
Storm the Castle. He also runs a
YouTube channel with loads of wonderful creative gadgets you can make from common household materials. You can find the saw cleaver tutorial
here.
Firstly, we printed out the provided template on a large sheet of paper. If you don't have access to such a printer, you can simply print out the individual parts on smaller sheets of paper (consult Storm the Castle for details).
Next, we pasted the paper templates onto a hardboard sheet (you can decide on the thickness you prefer).
The hardest part of this entire process was cutting out the correct shape with a Dremel multi-tool. Marius spent several hours sweating away at this, making sure to be as precise as possible with the jagged teeth of the blade.
Finally, we had the basic shape of the weapon to work with.
Next up was pasting the different parts of the handle together. This version of the saw cleaver actually includes a retractable handle to showcase the 'trick' part of the weapon, and the handle also had to be nice and sturdy; thus, the three-layered approach.
We used rubber bands and screws to secure the freshly-glued parts together, and left the cleaver for a few days to dry completely.
Even at this stage, you could remove a screw or pin in order to extend the handle and showcase the two different looks of the saw cleaver.
After the glue had dried, it was time to disassemble the cleaver again and give it a nice black base coat of enamel paint.
When the paint on the handle had dried, we had fun wrapping it with bandages we had 'dirtied' by rubbing in mud and letting them dry. We used a hot glue gun to fasten the bandages to the handle.
Marius applied silver paint on the blade and on the tip of the handle, using a dry-brushing method to make the surface seem textured and battered.
Finally, we could hot-glue bandages to the blade as well, and then apply some 'blood' (red and black mixed fabric paint) to both sides of the blade. And voilà - we had a dangerous-looking saw cleaver.
The pin connecting the handle and blade could be moved in order to release and secure the handle in its extended position - a nice trick weapon touch that impressed the judges at the cosplay competition.
Let's have a look at the rest of the Bloodborne Hunter outfit:
In brief, the hat was an iParty pirate hat that we reworked and stitched up to more closely resemble the Hunter's hat. The face buff came from the sleeve of an old T-shirt (cosplay clever, not expensive, people). The cape came from a previous Darth Vader cosplay (it's short because it was created for Annalene), and you can find an awesome tutorial on easy no-sew capes
here. The shirt was a normal white dress shirt that we splattered with fake blood from iParty's Halloween section. Marius also wore brown iParty suspenders hanging from his pants. The boot spats also came from iParty - we have used these in everything from pirate to medieval wedding to steampunk to Bloodborne. And finally, even though it is not clearly visible in the picture, Marius wore a small blood vial attached to his belt - an empty beard oil bottle that we repurposed for the cosplay.
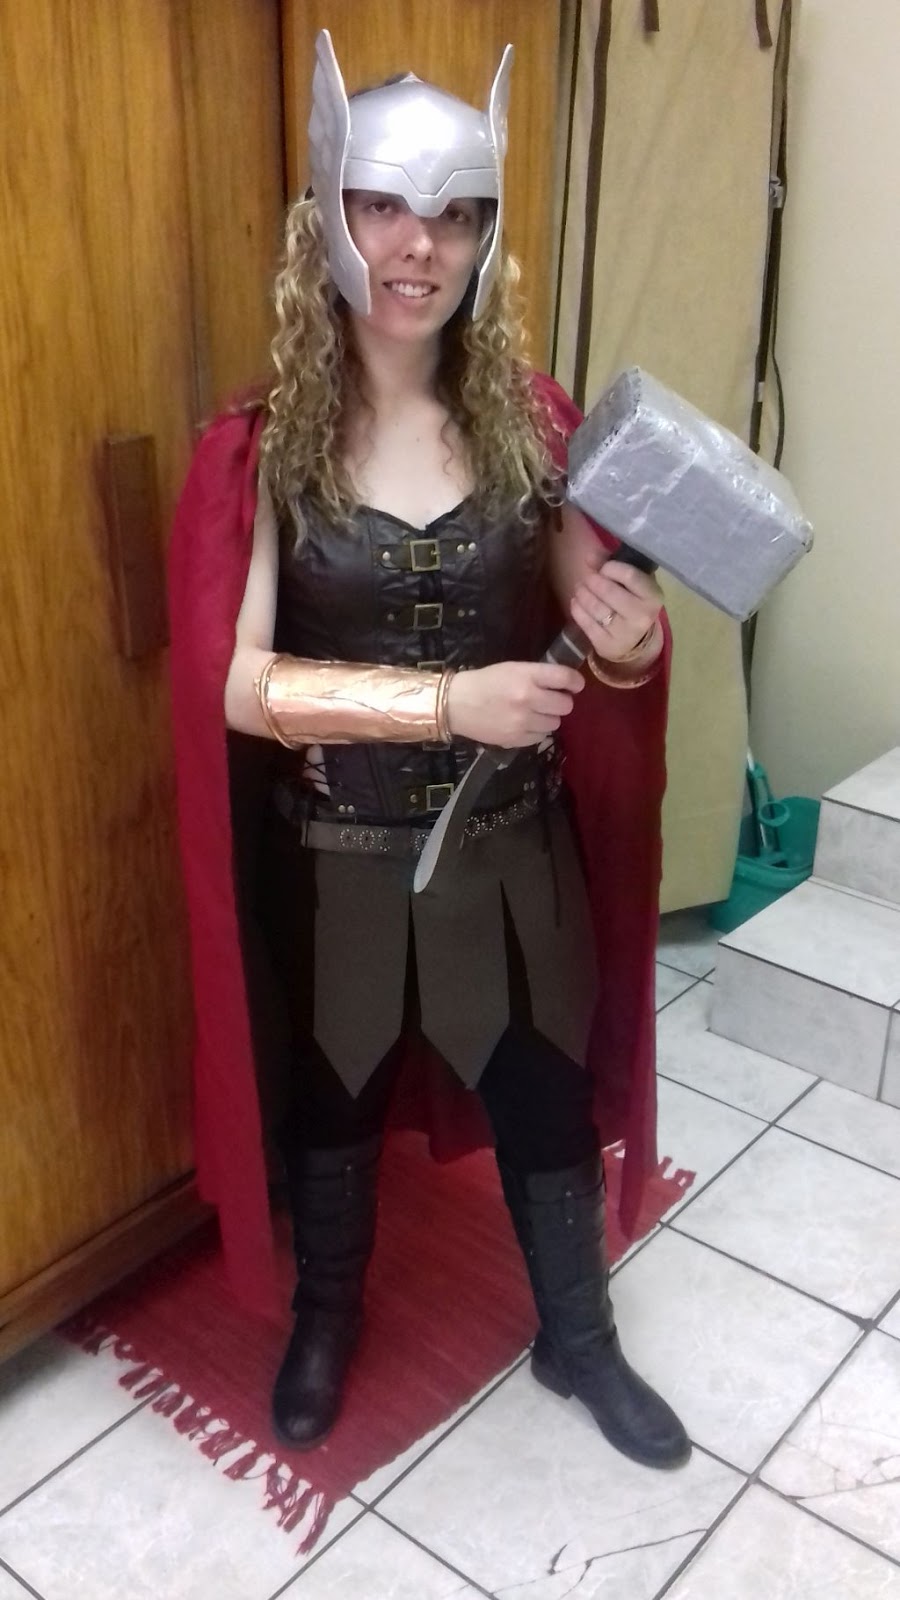
Next up, we have Jane Foster as Thor (based on a relatively new comic book story arc). This cosplay was kind of made up of our own interpretation of female Thor, and not really based on how Jane Foster actually looks in the comic books - something which definitely stretches the definition of 'cosplay', but nevertheless looked kind of badass, in our opinion.
Let's start with the most important item: Mjölnir.

We did not take any pictures of the forging of this great hammer, since we were rather skeptical of its success, so here is a brief description of how it was created. Firstly, we glued a few large sponges together (we got them from the cleaning supplies aisle). We used a multi-tool to bevel the edges a bit and create a less 'square' effect. Then, we placed a wooden axe handle into the sponges, securing it at the top with a jam jar lid and a screw. Next, we covered the hammer part with three layers of papier-mâché, let it dry, and then painted it with a base coat of black enamel paint and a topcoat of silver enamel paint. The handle was also painted silver, and as with the saw cleaver, we used a bit of dry-brushing to create a weathered effect. We then used a hot glue gun to glue strips of fake leather onto the handle, creating the iconic loop at the end. The hammer had a nice solid feel to it, but it wasn't too heavy, which is a nice bonus when you have to carry it around all day and remain in character.

The brass bracers were, like the saw cleaver, inspired by
Storm the Castle. We cut out a template from an old cereal box, taped it into shape, and added a few layers of papier-mâché. After this had dried, we could cut them open at one end (otherwise, you would never be able to get them on). We then glued pieces of an old network cable onto the edges for some detailing, and spray-painted the whole thing a nice brass colour (to match the corset Thor would be wearing). These ended up looking quite nice, but they probably won't last forever, and they are quite scratchy and uncomfortable to wear - we need to improve on our bracers design for the next cosplay.
The helmet was a very plastic toy-looking item that we bought at a toy store somewhere. To make it look a bit more realistic, we filed it slightly and then used a plastic base coat and a coat of metallic spray paint, which did improve the look.
To complete the Thor look, Annalene wore a no-sew red cape previously created for a
Valkyrie Halloween costume (same pattern as the Hunter's cloak), along with a steampunk corset we ordered off Raru (find it
here). We used the sheet of fake leather bought for Mjölnir's handle to cut out a warrior skirt which was tied together at the back and held in place by a belt. And finally, a pair of black jeans and long black boots finished off the Asgardian warrior outfit.
We learned from this experience that creating even something basic for a cosplay can take an insane amount of time, but it is a wonderful feeling to know that you've accomplished something that pays homage to a character or world that you love. Look out for our future endeavours on this blog!